Quick Overview
- ✨Search by City or Postal Code using a geocoding API
- ✨Display current weather and forecast for the next 7 days
- ✨Usage of the Browser Geolocation API to get the current location
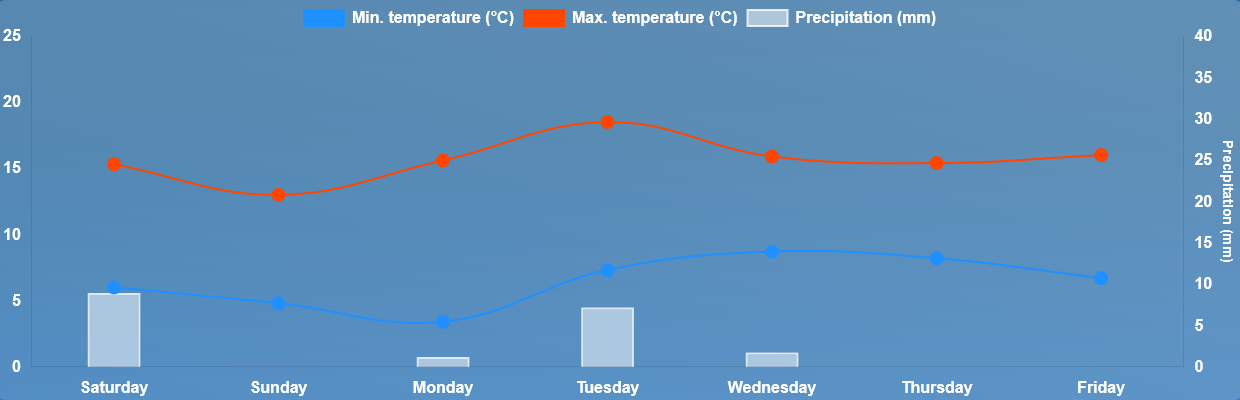
- ✨Temperature and Precipation in a graph
- ✨Dynamic background based on the weather
Process
Retrival of Geolocation
When a City or Postal Code is entered, the app uses the Nominatim Geolocation API to get the coordinates of the location. The coordinates are then used to get the weather data from the Meteomatics Weather API.
Alternatively, the app uses the Browser Geolocation API to get the current location of the user. The coordinates are then used to get the weather data from the Meteomatics Weather API. When the Geolocation is fetched from the Browser the app uses the Nominatim Geolocation API Reverse Strategy to get the display name of the location.
Fetching of Weather Data
After the app recieved the data from the Meteomatics Weather API it transforms it to make it more usable. The data is then stored in the app state and displayed in the app. The app uses the Vue Composition API to manage the state and the data fetching.
Display of Weather Data
The data is then displayed in the app. The app uses the Chart.js library with vue-chart-3 to display the temperature and precipitation in a graph. The app also uses the Bootstrap library to style the app.
User Interface
General Design
The apps user interface was inspired by Samsung Weather and the designs presented in this Blog Post.
Many elements have a glass morphism effect which fits the weather theme. This is achieved by using a CSS Blur effect.
.glass {
  background: linear-gradient(to top right, rgba(255, 255, 255, 0.15), rgba(255, 255, 255, 0.25));
  backdrop-filter: blur(20px);
  border-radius: 10px;
}

.milky-glass {
  background: rgba(255, 255, 255, 0.25);
  backdrop-filter: blur(15px);
  border-radius: 10px;
  box-shadow: 0 4px 12px rgba(255, 255, 255, 0.2),
              inset 0 2px 4px rgba(255, 255, 255, 0.3);
  border: 1px solid rgba(255, 255, 255, 0.3);
}
Further Bootstrap Icons was used as icon library. Bootstrap was used with Bootstrap Vue Next to style the app more easily.
The app is fully responsive and works on all devices. The app also uses the Bootstrap Utilities to style the app.
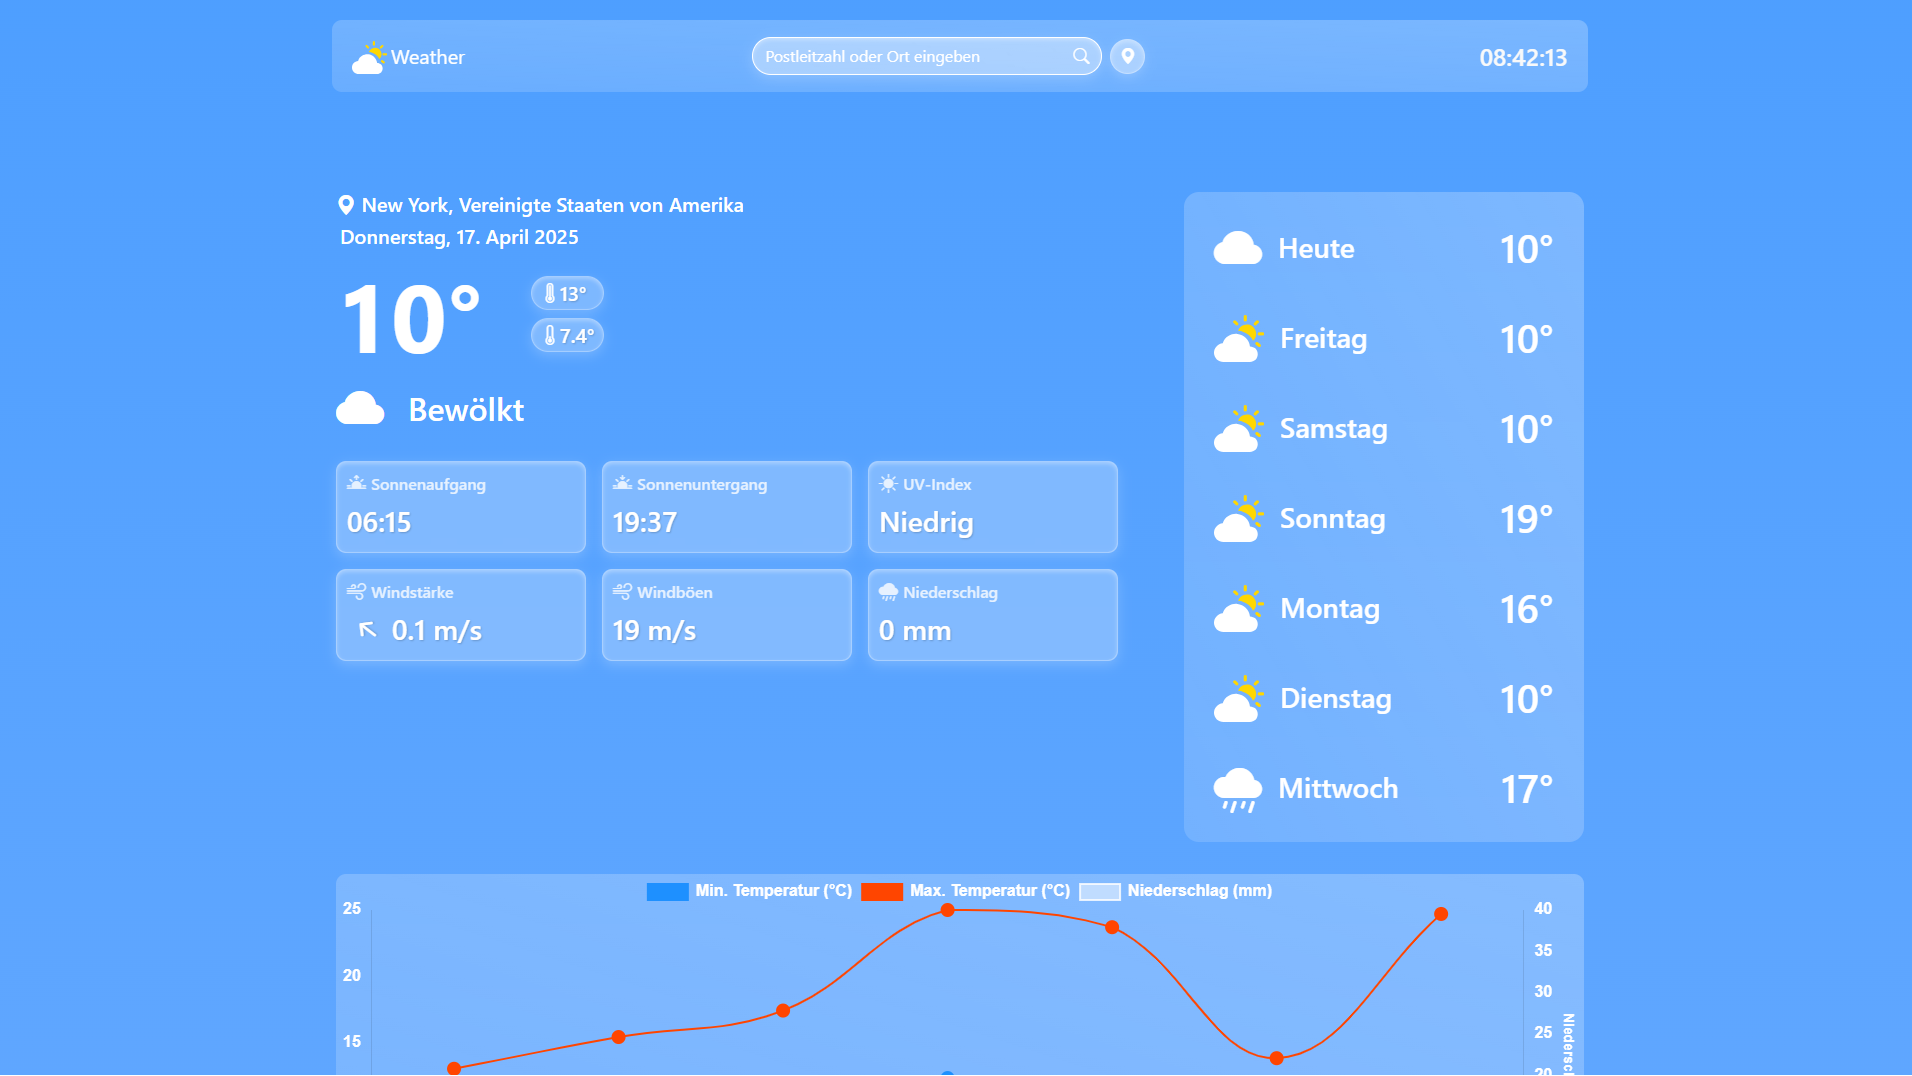
Background
The app uses a dynamic background which gets lighter or darker depending on the weather.
This effect is achieved by using a CSS Gradient as background and then moving it up and down depending on the weather.
.app-container {
  background: linear-gradient(to bottom,
    #295988,
    #2d6da1,
    #4a9dff,
    #5aa4ff,
    #6aabff,
    #7bb3ff,
    #8bbcff);
  background-size: 400% 400%;
  transition: background 3s;
}
Moving the gradient up and down is achieved by using the background-position property. The background position is mapped onto the weather type.
<div class="app-container" :style="{ backgroundPosition: weatherData ? weatherData[dayIndex].weatherIcon.backgroundPosition : 'center' }">
Play
Weather Icons
The App uses the Weather Icons from Bootstrap Icons and some custom made SVG icons. The icons are mapped onto the weather types provided by meteomatics. This includes:
- Weather Description: The description provided by meteomatics is used to determine the weather type.
- Icon: The icon is mapped to the weather type. The icons are provided by Bootstrap Icons and some custom made SVG icons.
- Icon Color
- Background Position: The background position is used to move the gradient up and down depending on the weather.
const getWeatherIcon = (weatherType) => {
    const weatherIcons = {
        '1': { // Sunny
            icon: 'bi-sun-fill',
            iconColor: '#FFD700',
            weatherDescription: 'Sunny',
            backgroundPosition: 'bottom',
        },
        '2': { // Light clouds
            icon: './icons/cloud-sun-fill.svg',
            isSVGIcon: true,
            weatherDescription: 'Light clouds',
            backgroundPosition: 'bottom',
        },

        // ...more weather types

        '5': { // Rainy
            icon: 'bi-cloud-rain-fill',
            iconColor: '#FFF',
            weatherDescription: 'Rainy',
            backgroundPosition: 'top',
        },

        // ...more weather types
    };

    return weatherIcons[weatherType] || weatherIcons['4'];
}
Difficulties
Timezones
A major dificulty were the timezones for the sunrise and sunset. By Default the Browser uses the local timezone of the user but that didnt make sense for the app.
The solution was the tz-lookup library which uses the coordinates of the location to get the timezone of the location.
Two Colored Icons
We needed Icons like a sun behind a cloud which we wanted to be yellow and white but Bootstrap Icons does not support two colored icons.
The solution was to recreate some icons as SVGs with two colors and use them in the app.
Learnings
- Vue3 and the Composition API
- Usage and Transformation of API data
- CSS Blur and Gradient Effects
- Chart.js and Vue Chart 3
- Extending Bootstraps default styles
- Using the Browser Geolocation API